Purpose & Background
In today's day and age of electronic delivery, often firms still have at least some subset of recipients who still wish to have paper delivery of their reports. Therefore, one form of delivery is to print the assemblies to paper. To print the assemblies, select all the assemblies you wish to print in the Assemblies pane of the window.
Print your Assemblies
Note: You can select all or a portion of the assemblies using the common Windows keyboard commands (Ctrl+A will select all the assemblies on the list. Shift+click and Ctrl+click work in this pane as well).
Right-click and choose Send to > Printer
The Print Job Manager will open listing all of the Assemblies
Select the printer you wish to print to from the "Printer Name" drop down.
Select the Start Printing button.
If you need to pause printing (perhaps in order to get a document through the printer before continuing the rest of the print jobs), simply select Pause.
When you're ready to resume printing, you can select the Resume button to continue
Selecting the Reset button will start you over with a fresh list of assemblies
You can also see the number of jobs that you have sent to the printer and how many have been completed.
If you accidentally send an Assembly to the printer that shouldn't have been sent, you can right click on that Assembly and choose to "Remove Selected Jobs"
If you firm would like an "audit" of the items that have been printed, upon completion of sending the files to the printer, you can right click and choose "Copy to clipboard"
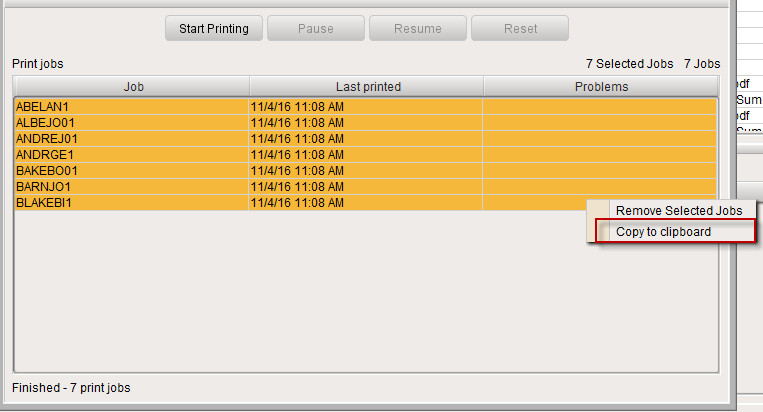
This will place a copy of the table with the print results on your clipboard. From there you can paste into Excel for your logs.
Advanced Printing
Advanced Printing features are available if your printing process requires stapling, and/or different tray pulls
You will send the assemblies to the Print Job Manager the same way that you would if you did not require Advanced Printing, however, when the Print Manager opens, you will have some additional steps:
For each section that you wish to use one of your configured printer settings, you will add that configuration to the Printer Setting column. Click in the box and choose the configuration from the drop down menu.
If a section of the assembly is a part of a subassembly or "nested", by default it will hold the attributes of the level above it.
In the example below, the sections below the "Reports Assembly" will automatically use the settings of the "Reports Assembly" (Stapled).
The Cover Letter and Invoice are at the same level in the assembly nesting structure. If you set the Cover Letter section to have "Doublesided", the invoice will also have the preset of "Doublesided". You can choose to use a different setting for the Invoice (or any other section that is nested together) as in the example below with the Invoice.